How to properly create files
So, you want to print 3D writings but you don’t know what to do? Don’t worry, we will help you out!
1. Graphic file
In order to create perfect 3D writings, you will have to provide us with one file only with two layers: on the first layer you will enter the cut path, while on the second one you will indicate the graphic design(s) to be printed. Remember to place the graphic design(s) 5mm over the entered Cut and to place one cut line at least 4mm away from the other one so as to have a perfect finishing.
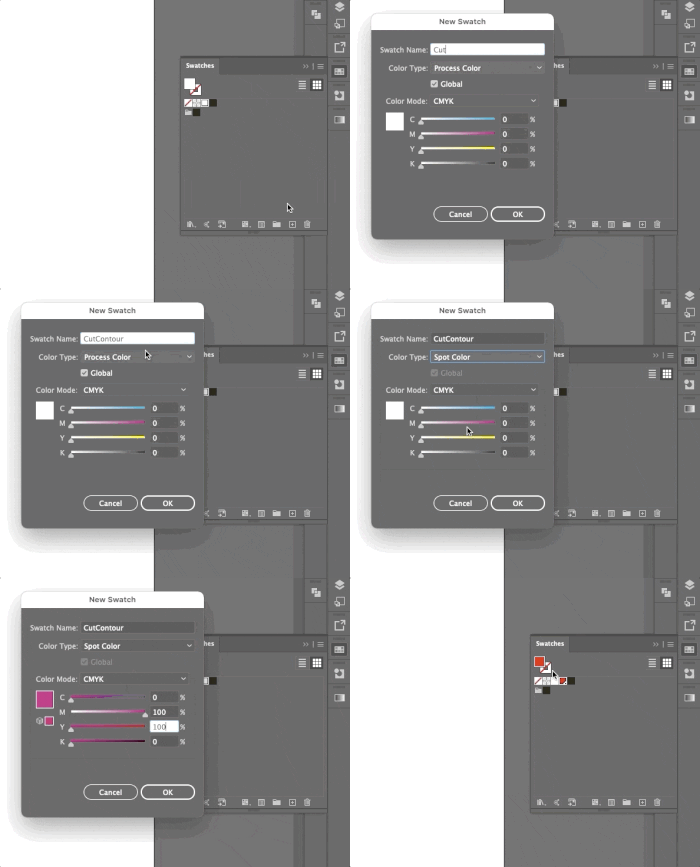
Remember to set the colour named CutContour, that you will use to design the cut, as SpotColor.
 Download the example file
Pay attention to the size
Don’t forget that, in order for your 3D writing to be reproduced, all the graphic elements (that is, both letters and graphic designs) shall be at least 18mm thick. Moreover, the space between two cuts shall be at least 4mm.Make sure you convert to paths
Remember to convert fonts to paths on Adobe Illustrator® by clicking TYPE > CREATE OUTLINES and paths to outline strokes by clicking OBJECT > PATH > OUTLINE STROKES.Checklist
Always remember that your file has to comply with the following features that apply to every file:
- 1:1 scale and 5mm bleed for each side
- CMYK colour model
- High-quality PDF
- Images resolution: 300ppi
- Always check the internal security margins.
For the complete checklist please read out Complete checklist file
Do you still have any doubts?
Ask for our Professional Check

Creating a perfect print file is not always a walk in the park. This is why our support service is ready to help you. In the product settings, you can opt for our Professional Check. In this way, our preprinting department will thoroughly check and fix any problem, if needed.
Otherwise, contact us. We are always willing to resolve any doubt.

Getting around the world of cards has never been easier. Select the filter, compare them and choose yours!